CHAPTER 2. ñ STRIPPING
Aim
1. The aim of all stripping lesson is to teach the men the correct method of stripping the gun and its parts, so that they can maintain the gun and replace breakages as quickly as possible. The man is taught to strip the gun in a certain sequence.
This sequence should normally be adhered to, as it is devised to ensure that the gun or its parts are stripped rapidly and without damage.
Competitions and tests
2. In all stripping competitions and tests, DP stores must be used. Precautions will be taken to avoid damage to the gun by careless handling.
Lesson 3. ñ GENERAL POINTS
A INSTRUCTORS NOTES
Class and instructors
1. Squads under squad instructors. Squad seated in a semi-circle facing the instructor.
Periods
2. One 45-minute period.
Stores
3. Gun, tripod, spare parts case and box and as many locks as are available.
Preparation
4. All tools removed from case and the box and laid out on a table, the gun mounted in such a position that all the squad can see it.
B CONDUCT OF LESSON
Revision
5. Revise on the names of a few main parts as taught in Lesson 1.
Approach
6. State the aim of all stripping lessons.
7. Tell the squad that before learning how to strip the gun, there are certain general points which must be known to avoid damage to the gun.
Use of correct tool
8. Explain and demonstrate the use of the correct tool for the job, eg, screwdrivers accroding to the size of the screw and correct punches, accroding to the type and size of the pin to be removed.
Point out that if this rule is not observed, screws and pins will get burred and the assistance of an armourer will be required to remove them.
Screwed axis pin
9. Tell the squad and demonstrate that when removing screwed axis pins, the threads must be fully unscrewed or they wil be damaged.
10. Point out and demonstrate that when replacing screwed axis pins, the threads must be engaged without the use of force to avoid crossthreading.
Front and rear covers
11. Explain and demonstrate that before closing the front cover, the feedblock must be in position and the front cover catch raised, otherwise damage may occur to the front cover.
12. Explain and demonstrate that when raising the rear cover, it must be lifted under control. If it is thrown back, the hinge may be damaged. When the rear cover is lowered, the lock must be correctly placed in the gun.
Securing chains
13. Point out that parts secured by chains, eg, outer casing split pin, cork plug, must not be removed by pulling on the chains; otherwise chains may be broken and a vital part lost.
Use of hammer
14. Demonstrate the use and misuse of the hammer. Explain that direct hammer blows must not fall on the gun. Wood must always be placed over the part which requires a hammer blow.
Firing the lock
15. Explain that the firing pin must never be released unless the extractor is up against the extractor stop, ot the striker may be broken.
16. State that the lock must be fired when it is in or out of the gun, except when the gun is loaded, to release tension on the lock spring.
17. Demonstrate, and pratice the squad in firing and cocking the lock. To fire the lock, the extractor must be fully raised all the time, and the tail of the sear depressed by pressing down the side levers head, until a click is heard. The tail of the trigger is then pushed to the rear and the firing pin will go forward.
To cock the lock, force the side levers head right up as far as possible, when the firing pin wil be held to the rear.
Conclusion
18. Question to and from the class.
19. Sum up main points and emphasize that with reasonable care defects and breakages in machine guns are of rare occurance. They are mainly due to neglect of ordinary precautions.
Lesson 4. ñ STRIPPING THE GUN
A INSTRUCTORS NOTES
Class and instructors
1. Squad under squad instructors. Squad seated in a semi-circle around gun.
Periods
2. One 45-minute period.
Stores
3. Gun, tripod, and spare parts case.
Preparation
4. The necessary tools should be removed from the case and the gun mounted.
B CONDUCT OF LESSON
Revision
5. Revise on points of stripping (see Lesson 3).
Removing the lock
6. Explain and demonstrate that the gun is unloaded, the crank handle pulled back on to the roller and the rear cover raised. The thumb or first finger of the left hand is placed between the extractor and stop, and the right thumb on the milled base of the connecting rod. The crank handle is allowed to move slightly forward so that the lock can be lifted clear of the side plates and breech casing. The lock can then be turned slightly and removed from the conecting rod.
When the lock has been removed, the crank handle is allowed to move forward under control on to the check lever. While this is taking place, the right thumb, by bearing on the milled base of the connecting rod, prevents the connecting rod from fouling the botton of the breech casing.
The rear cover is then closed, and the lock fired.
Muzzle attachment
7. Explain and demonstrate that the split pin is withdrawn and the blast deflector removed. The outer casing can now be turned and removed. Finally the muzzle cup is unscrewed by means of the combination tool and removed.
Feed block
8. Raise the front cover, lift out the feedblock, and close the cover.
Fusee spring and fusee
9. Describe and demonstrate that with the right hand at the rear of the fusee box and the left hand at the front, the box is pressed forward until it is clear of the studs and then removed; the spring is then disconnected from the fusee chain.
10. The fusee is turned to the rear, until the lugs on the stem are free, and then withdrawn.
Recoiling portions
11. Explain and demonstrate that the rear cover is raised, the T fixing pin is unscrewed and the rear cross-piece lowered. The right and left slides are then removed and the barrel and side plates withdrawn. The side plates are then disconnected, the left one first.
12. With the gun stripped, complete the description of the parts.
Assembling the gun
13. Describe and demonstrate assembling the gun. All that this in fact entails is reversing the operations of stripping the gun.
14. Ensure that when assembling the barrel and side plates, the radial groove is uppermost and that no force is used. If the side plates are not home on the barrel trunions and crank shaft, the barrel must not be placed in the gun, otherwise burrs on the crank shaft may occur.
Practice
15. Practice the squad in stripping and assembling the gun individually, the rest of the squad watching for errors.
In order to make sure that the squad learn the names of the parts, it is advisable to make them name all parts as they are handled.
16. Initially it is desirable to make the men place the parts in order as they remove them, but later as they become more practiced the instructor should mix them up and require the squad to select the correct parts themselves when assembling the gun.
Conclusion
17. Questions from the class.
18. Further practice for backward men.
19. If time allows, small competitions are of value.
20. Sum up sequence of stripping and assembling.
LESSON 5. ñ STRIPPING THE LOCK
A INSTRUCTORS NOTES
Class and instructors
1. Squads under squad instructors. Squad seated around the table.
Periods
2. One 45-minute period.
Stores
3. As many locks as available together with punches No. 5 or T fixing pins.
B CONDUCT OF LESSON
Approach
4. Breakages or damage to parts of the lock are the most common casualties when carrying out prolonged shoots. In order that the gun may be kept in action, rapidity and accuracy in stripping and assembling the lock are most important.
Stripping the lock
5.Explain and demonstrate the method of stripping the lock, the squad imitating stage by stage. Name the parts of the lock as they are removed.
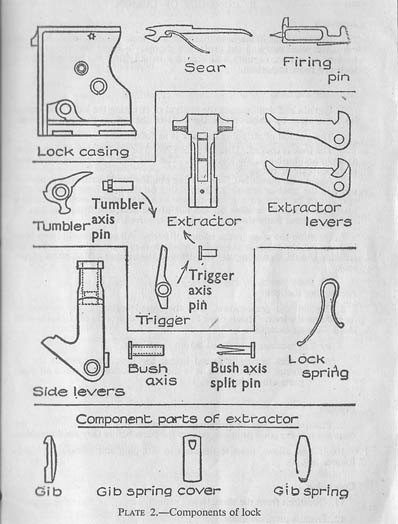
6. The method of stripping the lock is as follows:ñ
The lock is cocked. Using a punch No. 5 or the T fixing pin, the bush axis pin and bush axis are forced out. The side levers, extractor levers and extractor can be removed.
Again with punch No. 5 or T fixing pin, the tumbler axis pin is pushed out and the tumbler removed. By pressing on the tail of the sear, the lock spring can be released and the trigger axis pin, trigger and lock spring taken out. Again pressing on the tail of the sear, the firing pin can be shaken out and lastly the sear and spring removed.
7. Question the class in the names of parts. All parts should have been laid out on the table in the order in which they were removed. The instructor should then complete the detailed description of the parts of the lock.
Assembling the lock
8. EXplain and demonstrate, with the squad imitating, the method of assembling the lock. This is done by reversing the process of stripping with the following exceptions:ñ
The tumbler is replaced before the trigger.
The lock spring is forced home, the long arm towards the extractor when the lock is in the fired position and when all other parts are assembled.
Practice
9. Practice the class in stripping and assembling the lock. When the class are making good progress, mix up the parts before they are assembled.
10. If time allows, practice the class in stripping and assembling blindfolded.
Conclusion
11. Questions from the class.
12. Discuss progress made.
LESSON 6. ñ STRIPPING THE FEEDBLOCK
A INSTRUCTORS NOTES
Class and instructors
1. Squads under squad instructors. Squad seated around a table.
Periods
2. One 45-minute period.
Stores
3. As many DP feedblocks as available, hammer, pliers, T fixing pin, punches No. 5.
B CONDUCT OF LESSON
Stripping the feedblock
4. Explain and demonstrate, the quad imitating stage by stage, stripping the feedblock. Name the parts as they are removed.
5. To strip the feedblock, the split pin holding the top and bottom levers must be forced out using the T fixing pin or No. 5 punch and hammer, and the top and bottom levers separated. The slide will now come out and the pawl and spring can be removed. The bottom pawl axis pin must be extracted with the pliers and the spring and pawls taken off.
6. With the feedblock stripped, complete the description of the parts.
Assembling the feedblock
7. Explain and demonstrate, with the squad imitating stage by stage, the method of assembling the feedblock, which is merely to reverse the above operations.
8. Further practice should be given in stripping and assembling.
Conclusion
9. Questions for the squad.
10. Questions to squad on names of parts.
11. Sum up sequence of stripping and assembling and discuss progress made.
LESSON 7. ñ STRIPPING COMPONENT PARTS
A INSTRUCTORS NOTES
Class and instructors
1. Squads under squad instructors. Squad seated around the gun in a semi-circle.
Periods
2. One 45-minute period.
Stores
3. Gun, tripod, spare parts box and case and as many extractors as available.
Preparation
4. The necessary tools hsould be laid out on a table.
B CONDUCT OF LESSON
Revision
5. Get two members of the squad to strip the gun and lock and lay the parts on the table. Question the remainder of the squad on the names of the parts handled.
Approach
6. This lesson deals with the stripping and assembling of a number of small parts which may on occasion have to be stripped for cleaning and replacement.
Stripping component parts
7. Explain and demonstrate the method of stripping and assembling the parts given below. Practice the squad after each stage.
(a) Front cone.ñ The front cone is unscrewed by means of the combination tool.
(b) Packing gland.ñ The packing gland is unscrewed by means of the combination tool. When assembling, the gland must be screwed fully home.
(c) Front cover catch.ñ The plug must be pushed inwards and given a quarter turn with a screwdriver. If pressure is released, the spring will force the plug out. Before the plunger is removed, it must be turned so that the slides are free to pass the lugs in the catch.
(d) Extractor.ñ If the gib spring cover is pushed out with a punch, the spring and gib can be removed.
(e) Tangent sight.ñ The axis pin must be unscrewed and removed. The tangent sight, piston and spring can then be taken off.
(f) Rear cover lockñ The axis pin must be unscrewed and removed. The rear cover lock can be lifted off and the spring pushed out with a punch.
(g) Trigger bar.ñ When the rear cover lock is off, the trigger bar spring can be removed.
(h) Roller.ñ The split pin is removed with pliers and the collar and roller will then slip off.
(j) Sliding shutter.ñ The catch must be depressed and the shutter moved to the front until it is up against the stop.
If the plunger is then pushed in with a No. 3 punch, and the catch pushed in, the shutter can be moved forward unti lit is clear of the breech casing.
8. Practice the squad in stripping and assembling all componenent parts.
Conclusion
9. Questions from the class.
10. Questions to the class on names of parts.
11. Discuss progress made.
LESSON 8. ñ CHANGING THE BARREL WITHOUT DRAINING THE BARREL CASING
A INSTRUCTORS NOTES
Aim
1. To impress upon the squad the importance of conserving the water supply at the gun.
2. To teach the method of changing the barrel without draining the barrel casing.
Class and instructors
3. Squads under squad instructors. Squad seated in a semi-circle around the gun.
Periods
4. One 45-minute period.
Stores
5. Gun, tripod, spare parts case and cloth for making plug. If available, two guns are of value to ensure maximum practice.
Preparation
6. The barrel must be packed and the barrel casings filled with water.
B CONDUCT OF LESSON
Revision
7. Question class on the water cooling sytem (see Lesson 1).
Approach
8. The necessity for saving water depends entirely on the prevailing conditions. In tropical countries water is often very scarce. Under active service conditions getting more water may often endanger a man's life or give away the gun position. On actice service, therefore, evry care should be taken to conserve the supply of water with the gun.
9. After firing a number of rounds, the barrel may become worn and require changing.In barracks or billets, where a supply of water is available this merely entails draining the barrel casing, changing the barrel and refilling the casing.
10. Should, however, the barrel require chaning during a shoot, a more rapid method and one less wasteful of water has been devised.
Changing the barrel without draining the barrel casing
11. Tell the squad that the normal sequence of stripping is followed until the slides have been removed. It should be noted that most parts would normally be hot and the instructor should not allow the muzzle attachment or barrel, for example, to be handled with bare hands.
12. Detail two men as Nos. 1 and 2 and get the gun stripped down as in para 11.
13. The next stage is to remove the elevating joint pin, dpress the gun and replace the elevating joint pin in the gun bracket.
14. Teach the duties of No. 2, who must prepare a plug for stopping-up the front end of the barrel casing by wrapping a piece of cloth around the end of a clearing plug or other suitable implement. Explain that the No. 2 must insert the plug in the muzzle of the barrel and, as the recoiling portions are withdrawn, follow the barrel with the plug in order to close the hole at the front end of the barrel casing.
15. Explain the duties of the No. 1. The No. 1, when the No. 2 is ready, withdraws the recoiling portions, lifts the barrel clear of the breech casing and by opening the side plates, allows the old barrel to drop clear.
16. Explain that to place the new barrel in the gun is merely the reverse of the above operations. Emphasize that the No. 1 must be careful not to damage the front packing when replacing the barrel and that the No. 2 must not remove the plug until it is pushed clear by the end of the barrel.
The gun must not be leveled until the barrel and sideplates have been replaced or water may leak out of the rear end of the barrel casing.
17. Nos. 1 and 2 should now complete the reassembling of the gun.
18. Practice the squad in pairs in changing the barrel.
Conclusion
19. Questions from the class.
20. Sum up the main points and progress made.
<-- CHAPTER 1
CHAPTER 3 -->